Providing Google SSO via AWS Cognito
I want to attempt to demystify the "complexity" behind SSO flows. In general the flow can be described as a few back and forth between providers, clients, and users where it does checks to see if the users exists, and if they are valid. I'll cover - and it can be difficult to understand initially. I'm going to build a AWS Cognito + Google SSO setup to allow users to authenticate with their google accounts.
Infrastructure as Code
I'll be building the Cognito side of things exclusively in Terraform, and I'll be doing the Google side of things via the GCP console.
GCP
Jumping into the simple part first, we need to create a Google Cloud Platform project. This is where we'll configure the credentials that AWS Cognito will use to authenticate users. We'll be setting up OAuth 2.0 credentials. Theres not much to configure here, just a few fields to fill out.
Authorized JavaScript Origins
This is the URL of your application that will be using Google SSO. For example, if your app is hosted at https://myapp.example.com, you would enter that URL here. It's important to note that if you are using a custom domain for your Cognito User Pool, you will need to use that domain here instead of the default Cognito domain. Personally, I set up up a subdomain for my auth flow. For Cognito hosted domains, it will look like https://<your_cognito_domain>.auth.<region>.amazoncognito.com.
Authorized Redirect URIs
This is the URL that Google will redirect users to after they have authenticated. For AWS Cognito, this will typically be in the format https://<your_cognito_domain>/oauth2/idpresponse. Make sure to replace <your_cognito_domain> with your actual Cognito domain. For cognito domains it'll look more like https://<your_cognito_domain>.auth.<region>.amazoncognito.com/oauth2/idpresponse.
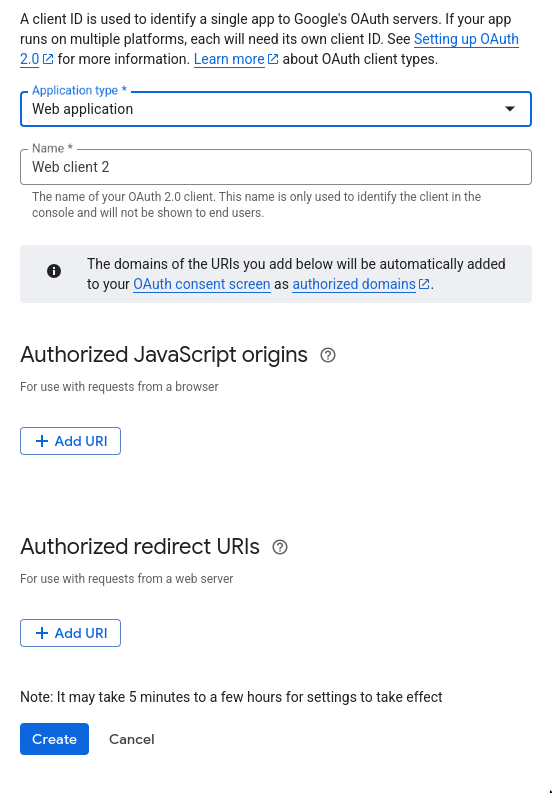
Creating an OAuth2 client in GCP
For now, we'll be leaving these fields empty and returning once we have our Cognito User Pool set up.
Cognito
Now that we have our GCP project set up, we can move on to AWS Cognito. We'll be using Terraform to create the necessary resources.
User Pool
We'll start by creating a Cognito User Pool. This is where our users will be stored and managed. Here's a basic Terraform configuration for the User Pool:
resource "aws_cognito_user_pool" "my_user_pool" {
  name = "my_user_pool"

  auto_verified_attributes = ["email"]
  username_attributes = ["email"]


  policies {
    password_policy {
      minimum_length    = 8
      require_uppercase = true
      require_lowercase = true
      require_numbers   = true
      require_symbols   = true
    }
  }

  lambda_config {
    post_authentication = var.post_authentication_lambda_arn
    post_confirmation   = var.post_confirmation_lambda_arn
    custom_message      = var.custom_message_lambda_arn
    pre_sign_up         = var.pre_sign_up_lambda_arn
  }

  email_configuration {
    reply_to_email_address = var.reply_to_email_address
    source_arn             = var.source_arn
    email_sending_account  = var.email_sending_account
    from_email_address     = var.from_email_address
  }

  account_recovery_setting {
    recovery_mechanism {
      name     = "verified_email"
      priority = 2
    }
  }

  verification_message_template {
    default_email_option = "CONFIRM_WITH_CODE"
  }

  tags = {
    Environment = "production"
  }
}
Basic Cognito User Pool configuration
This configuration sets up a User Pool with email as the primary identifier, enforces a strong password policy, and configures Lambda triggers for various events. The email_configuration block is used to set up email sending options, which are required for user verification and notifications. I won't go into detail about the lambda triggers here, but they can be used to customize the user experience during sign-up, authentication, and other events - you can leave these blank and use cognito default triggers.
App Client
Next, we need to create an App Client for our User Pool. This is what our application will use to interact with the User Pool. Here's a basic configuration for the App Client:
resource "aws_cognito_user_pool_client" "my_app_client" {
  name         = "my_app_client"
  user_pool_id = aws_cognito_user_pool.my_user_pool.id

  generate_secret                      = false
  allowed_oauth_flows = ["code"]
  allowed_oauth_scopes = ["email", "openid", "profile"]
  allowed_oauth_flows_user_pool_client = true

  callback_urls = ["https://<your_cognito_domain>/oauth2/idpresponse"]
  logout_urls = ["https://<your_cognito_domain>/logout"]

  supported_identity_providers = ["Google"]

  write_attributes = [
    "email",
    "email_verified",
    "given_name",
    "family_name",
    "picture"
  ]

  read_attributes = [
    "email",
    "email_verified",
    "given_name",
    "family_name",
    "picture"
  ]

  token_validity_units {
    access_token  = "minutes"
    id_token      = "minutes"
    refresh_token = "days"
  }

  tags = {
    Environment = "production"
  }
}
Basic Cognito App Client configuration
This configuration creates an App Client that allows OAuth 2.0 flows, specifically the authorization code flow. You can see that we've specified "Google" as a supported identity provider, which is crucial for enabling Google SSO. The callback_urls and logout_urls should match the URLs you configured in GCP earlier, so make sure to replace <your_cognito_domain> with your actual Cognito domain.
So far we've set up a fairly standard cognito user pool and app client (the biggest difference at this point is our supported_identity_providers not being "COGNITO" and instead being "Google". The next step is to configure the identity provider (IdP) for Google SSO.
Cognito Domain
We need to set up a domain for our Cognito User Pool. This is where users will be redirected for authentication. You can either use a custom domain or the default Cognito domain. Here's how to set it up in Terraform:
resource "aws_cognito_user_pool_domain" "custom_domain" {
  domain         = "<your_cognito_domain>"
  user_pool_id   =  module.users.user_pool_id
  certificate_arn = module.cdn.cert_arn
}
Setting up a Cognito User Pool domain
Some keynotes here, specifically for using a custom domain vs the default Cognito domain. If you are using a custom domain, you'll need to provide a valid SSL certificate ARN; this in itself adds an annoying amount of setup if you're not already using ACM. This can be obtained from AWS Certificate Manager, make sure it's created in us-west-1 as cognito sets up a cloudfront distribution. If you're using the default Cognito domain, you can skip the certificate_arn field.
Identity Provider (IdP) Configuration
Now we can configure the Google Identity Provider in Cognito. This is where we link our GCP OAuth 2.0 credentials to the Cognito User Pool. Here's how to do it in Terraform:
resource "aws_cognito_identity_provider" "google" {
  user_pool_id  = module.users.user_pool_id
  provider_name = "Google"
  provider_type = "Google"

  provider_details = {
    client_id        = var.google_client_id
    client_secret    = var.google_client_secret
    authorize_scopes = "openid email profile"
  }

  attribute_mapping = {
    email        = "email"
    given_name   = "given_name"
    family_name  = "family_name"
    phone_number = "phone_number"
    name         = "name"
  }
}
Configuring Google as an Identity Provider in Cognito
In this configuration, we specify the client_id and client_secret that we obtained from GCP when we created the OAuth 2.0 credentials; an important note here is that although we can pass them in as values in the provider_details, its best practice to store them in a secure way, such as using AWS Secrets Manager or SSM Parameter Store, and reference them in your Terraform configuration.
data "aws_secretsmanager_secret_version" "example" {
  secret_id = "arn:aws:secretsmanager:us-west-2:123456789012:secret:my-google-client-secret"
}
Using AWS Secrets Manager to store sensitive information
The authorize_scopes field specifies the scopes that we want to request from Google, which typically include openid, email, and profile. The attribute_mapping field maps the attributes returned by Google to the attributes in Cognito.
Running terraform apply at this point will create the User Pool, App Client, and Identity Provider in AWS Cognito. Once this is done, we can return to our GCP project to finalize the OAuth 2.0 credentials.
Finalizing GCP OAuth 2.0 Credentials
Now that we have our Cognito User Pool and Identity Provider set up, we can return to our GCP project to finalize the OAuth 2.0 credentials. We need to update the Authorized JavaScript Origins and Authorized Redirect URIs with the values from our Cognito setup.
The Application Code
Now that we have our infrastructure set up we now ability to sign in via Google SSO. Let's implement the code to handle the authentication flow in our application. This will typically involve redirecting users to the Cognito hosted UI for authentication and handling the callback. We'll try and keep this simple for the example but you can expand on this as needed. I'll be using TypeScript for the examples, but the concepts apply to any language.
Redirecting to Cognito
To redirect users to the Cognito hosted UI for authentication, you can construct the URL like this:
function redirectToGoogleSignIn() {
  const callbackUrl = '<your_callback_url>';

  const authUrl = `https://<your_domain>/oauth2/authorize?identity_provider=Google&redirect_uri=${callbackUrl}&response_type=CODE&client_id=<your_client_id>&scope=email openid profile`;

  window.location.href = authUrl;
}
Redirecting users to the Cognito hosted UI for Google SSO
redirectToGoogleSignIn function will be the CTA for your users to initiate the Google SSO flow. Make sure to replace <your_domain>, <your_callback_url>, and <your_client_id> with the appropriate values from your Cognito setup.
Handling the Callback
After the user authenticates with Google, they will be redirected back to your application with an authorization code. You need to handle this code to get tokens from Cognito. We can think of this process as a exchange of the authorization code for tokens.
async exchangeAuthCodeForTokens(code: string): Promise<any> {
    const tokenEndpoint = `https://<your_domain>/oauth2/token`;

    const params = new URLSearchParams();
    params.append('grant_type', 'authorization_code');
    params.append('client_id', '<your_client_id>');
    params.append('code', code);
    params.append('redirect_uri', '<your_callback_url>');

    const response = await fetch(tokenEndpoint, {
        method: 'POST',
        headers: {
            'Content-Type': 'application/x-www-form-urlencoded'
        },
        body: params.toString()
    });

    if (!response.ok) {
        const errorData = await response.json();
        throw new Error(`Token exchange failed: ${errorData.error_description || errorData.error || response.statusText}`);
    }

    return await response.json();
}
Exchanging the authorization code for tokens
This function sends a POST request to the Cognito token endpoint with the authorization code to obtain access and ID tokens. Make sure to replace <your_domain>, <your_client_id>, and <your_callback_url> with the appropriate values from your Cognito setup.
Productionizing
In a production environment you'll want to perhaps things of extendability and security. Instead of having a specific function for one OAuth2 flow, you might want to have a more generic function that can handle multiple OAuth2 flows, we could call these stategies. Using libraries like passport.js can help with this, as it provides a framework for handling various authentication strategies, including OAuth2. You can also use libraries like oidc-client or aws-amplify to simplify the process of handling authentication flows with Cognito.
Conclusion
In this post, we've walked through the process of setting up Google SSO via AWS Cognito using Terraform. We've covered the necessary steps in both GCP and AWS, and provided code examples for handling the authentication flow in your application. While the initial setup may seem complex, once you understand the flow and how to configure the necessary parts, it becomes much more manageable.
Handling User Conflicts
One thing to keep in mind is that if a user tries to sign in with Google SSO and they already have an account in Cognito, you may run into conflicts. Cognito will try to create a new user with the same email address, which can lead to errors. To handle this, you can implement a pre-sign-up Lambda trigger that checks if the user already exists and merges the accounts if necessary.
Further Reading
OAuth 2 in Action (Amazon) Advanced Microservice Security: Implementing OAuth2 and JWT (Amazon) Amazon Cognito Documentation GCP OAuth2 Amazon Cognito